Before and after photos are the standard currency of aesthetic product marketing, from clinical-grade devices to drugstore serums. They are also the evidence format most vulnerable to uncontrolled variables that can produce apparent skin differences without any treatment having occurred. For consumers, reviewers, and editors evaluating before and after photos in aesthetic claims, a basic understanding of photographic science separates credible evidence from visual noise.
What controlled photography reveals
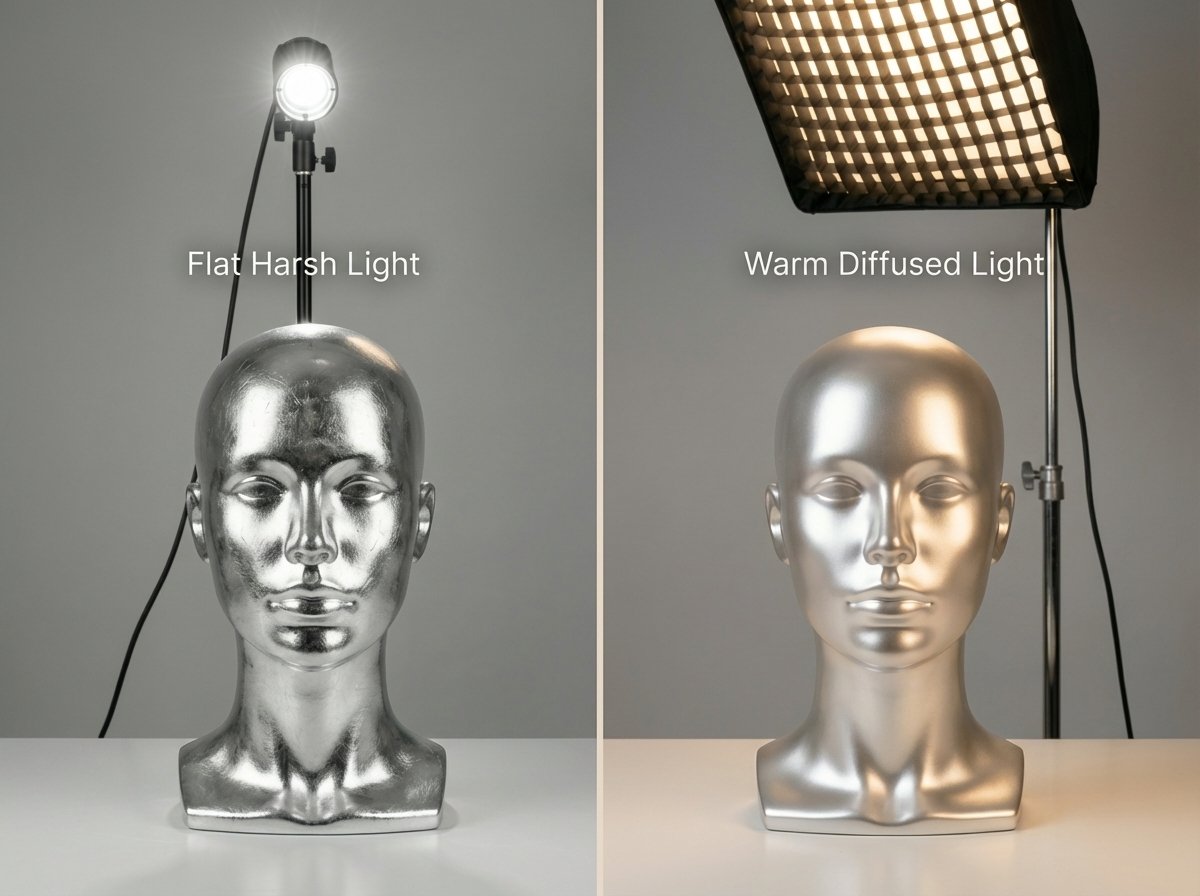
Clinical research uses standardized photography protocols for a specific reason: uncontrolled variables (lighting, angle, expression, color temperature, camera distance) can produce visible differences in skin appearance that are entirely attributable to the photographic conditions.
A face photographed under flat frontal lighting at 5500K color temperature will appear materially different from the same face, on the same day, photographed under angled diffused lighting at 4000K. No treatment has occurred and no time has elapsed, yet the before and after photos would suggest a visible change. The difference is purely photographic.
When marketing materials present before and after photos taken under different conditions and attribute the visible difference to a product, separating the treatment effect from the photographic effect becomes impossible without understanding the variables involved.
The six primary photographic variables
1. Lighting direction
How it works: Direct frontal lighting reveals maximum surface texture, pore structure, and line depth by minimizing shadows. Side lighting or diffused lighting fills shadows and smooths apparent texture.
Effect magnitude: Controlled studies demonstrate that lighting changes alone can simulate 2 to 4 years of apparent skin improvement without any treatment.
How to detect it: Compare the shadow under the nose, the shadow along the jawline, and the specular highlight position (the bright reflection on the forehead or cheek). If these differ between images, the lighting setup changed.
2. Color temperature
How it works: Cooler (bluer) light makes skin appear sallow and emphasizes redness, discoloration, and texture irregularities. Warmer (yellower) light makes skin appear healthier, more vibrant, and more even-toned.
Effect magnitude: A 1000K shift in color temperature (e.g., from 5500K to 4500K) produces a visible change in perceived skin health.
How to detect it: Compare the background color between images. If the background appears warmer or cooler, the color temperature changed. A neutral gray background is the most reliable reference.
3. Camera angle
How it works: Small changes in camera height or head tilt angle alter the apparent contour of the face. Lower angles emphasize jowling and submental laxity. Higher angles reduce them. Head rotation de-emphasizes or emphasizes nasolabial folds.
Effect magnitude: A 3 to 5 degree angle change can simulate the visual effect of modest skin tightening.
How to detect it: Compare fixed landmarks: the relative position of the ears, the amount of visible neck, the ear-to-chin relationship. If these change, the geometry changed.
4. Facial expression
How it works: Even subtle differences in expression affect line depth, midface position, and jawline definition. A relaxed brow versus a furrowed brow changes forehead lines. A slight smile versus a neutral expression lifts the nasolabial area.
Effect magnitude: Expression changes can account for differences that mimic months of treatment.
How to detect it: Compare eyebrow position, mouth corner position, and forehead muscle state between images. Standardized photography requires identical expression (typically neutral, closed mouth).
5. Camera distance
How it works: Camera distance affects perspective distortion. Closer cameras exaggerate features and increase the apparent size of near-camera elements. More distant cameras flatten features and smooth contours.
Effect magnitude: Moderate. Most visible in jawline and nose proportions.
How to detect it: Compare the relative proportions of central and peripheral facial features.
6. Post-processing
How it works: Digital adjustments to contrast, brightness, sharpness, saturation, and skin smoothing algorithms can alter apparent skin quality without changing the photograph’s metadata.
Effect magnitude: Potentially dramatic, but increasingly detectable through forensic image analysis.
How to detect it: Look for inconsistencies in texture detail between images. Overly smooth skin in the “after” image combined with high-detail skin in the “before” may indicate selective processing.
The clinical photography standard
Standardized clinical photography eliminates these variables through controlled conditions:
| Variable | Clinical standard |
|---|---|
| Lighting | Fixed position, consistent color temperature |
| Camera | Fixed distance, fixed height (Frankfurt plane), fixed lens |
| Expression | Neutral, identical between images |
| Makeup | None |
| Background | Neutral, identical |
| Processing | None, or identical adjustments |
| Timeframe | Documented and disclosed |
Before and after photos that meet these standards provide reliable evidence of treatment effect. Images that fall short of these standards provide unreliable evidence, regardless of whether the treatment itself is effective.
The selection bias layer
Even standardized before and after photos can mislead through selection bias. If a company photographs 100 treatment recipients and publishes the 5 best outcomes, the images are accurate but non-representative.
Clinical studies address this through aggregate reporting: outcomes for all enrolled subjects, including non-responders. Marketing materials have no equivalent requirement.
The question to ask: are outcome statistics provided alongside the before and after photos? A statement such as “78% of users reported visible improvement” is more informative than five selected success stories, because it accounts for the full range of responses.
Consumer evaluation checklist
- Do the shadows fall in the same direction in both images?
- Is the background the same color temperature?
- Are fixed facial landmarks (ears, moles, hairline) in the same positions?
- Is the facial expression identical?
- Does the brand provide aggregate outcome statistics?
- Were images taken under clinical photography standards?
A “yes” to all six questions indicates reliable photographic evidence. Each “no” reduces the evidentiary weight of the comparison.
Implications for the industry
Brands that voluntarily adopt standardized photography protocols make a competitive statement: they believe their products produce results that are visible even without photographic assistance. This signals clinical confidence.
Brands that have not adopted standardized protocols may still sell effective products, but their photographic evidence does not demonstrate it. The distinction is between having results and proving results.
For reviewers and editors, applying photographic evaluation standards to submitted before and after photos elevates editorial credibility. A review that evaluates photographic conditions alongside treatment claims provides more value to readers than one that accepts images at face value.
Visual literacy in reading before and after photos is a form of scientific rigor, and the brands that welcome it are the ones with evidence that survives scrutiny. elevates editorial credibility. A review that evaluates photographic conditions alongside treatment claims provides more value to readers than one that accepts images at face value.